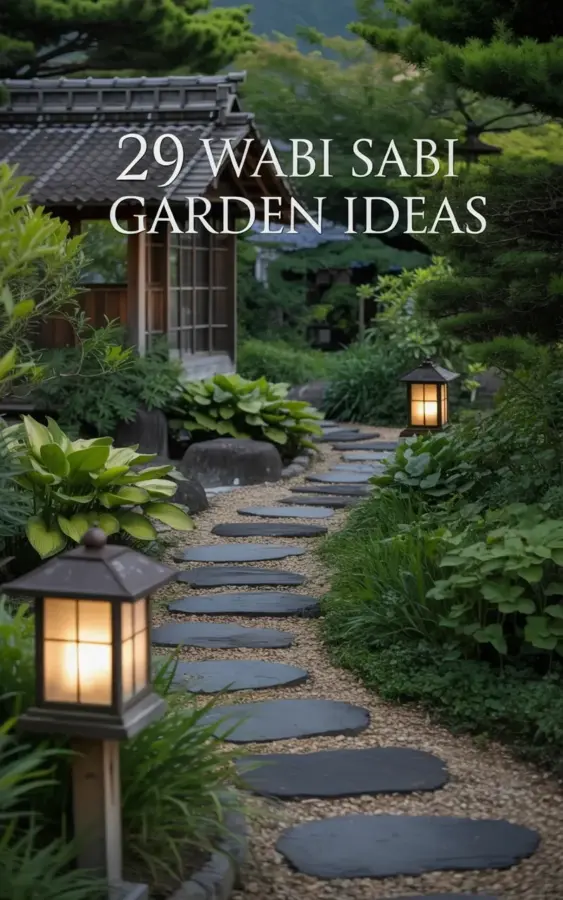
The gravel crunches underfoot as the last light fades, and those two black lanterns begin to cast their warm glow across the curved stones. This photo, pulled from a collection of 29 wabi sabi garden ideas, captures the exact moment a garden goes from daytime to dusk. It’s not perfect, not manicured, and that is precisely why it works.
Forget what you see in glossy magazines. Wabi sabi is about accepting imperfection, and this path embodies that philosophy with its mossy edges and uneven stones. The good news? You do not need a landscape architect or a huge budget to recreate this feeling. You need a few honest materials, a quiet corner, and maybe an afternoon of manual labor. Let’s talk about how to make this happen without emptying your wallet.
Why a Curved Japanese Garden Path Feels Different
Straight lines are for getting somewhere quickly. A curved stone path is for slowing down. The winding layout forces you to look at what’s beside you, not just what’s ahead. It creates a sense of mystery because you cannot see the entire path from the start.
In Japanese garden design, curves mimic natural waterways and mountain trails. Nothing in nature runs in a perfectly straight line, so our paths shouldn’t either. A curve also breaks up the visual weight of a small yard, making it feel larger and more layered.
Think about the journey instead of the destination. Where does the path lead? Maybe a bench, a water feature, or just a patch of quiet grass. The destination matters less than the walk itself.
Budget-Friendly Stones for an Authentic Look
New, perfectly cut pavers are expensive and they look too polished. Not gonna lie, they completely kill the wabi sabi vibe. You want stones that look like they’ve been sitting in the earth for decades.
Here’s your best option: check local classifieds and Facebook Marketplace for salvaged flagstone. People are constantly digging up old patios and selling the pieces for pennies. Look for irregular shapes in gray, brown, or even a hint of blue. The more varied the sizes, the more natural the final layout will be.
If flagstone is hard to find, concrete stepping stones work too. Buy them round or square, then place them unevenly. Space them far apart so you have to take a deliberate step, not a stroll. That gap between stones is where the magic happens, it forces you to slow down and watch your feet.
Lanterns That Actually Bring the Glow
Traditional stone lanterns (toro) from Japan are gorgeous, but honestly, the price tag is brutal. A real granite one can cost hundreds or even thousands of dollars. The lanterns in this photo are black metal, which is a much smarter buy.
I hunted for mine at a spring clearance sale and found two similar black metal lanterns for under forty bucks total. They’re lightweight, which is perfect because you can move them around as your garden changes. Look for ones with a cut-out pattern so the light flickers on the ground in interesting shapes.
For the light source, skip candles unless you enjoy replacing them every night. Solar stakes work, but place them in direct sun during the day. The best budget trick I know? Buy a short outdoor extension cord and use those little Edison bulb string lights threaded through the lantern body. The warm glow is unmatched.
Gravel and Moss: The Imperfect Filler
That light-colored gravel between the stones is doing more work than you think. It anchors the path visually and prevents mud from splashing onto your shoes. It also gives the whole area that dry, textured sound when you walk, which is oddly satisfying.
Go for pea gravel in a pale beige or white tone. A single bag costs about five or six dollars, depending on where you live, and a small path needs maybe five or six bags. Spread it two inches deep. Don’t edge it with plastic landscape borders. Let it spill over onto the soil slightly. That loose edge is what makes it feel organic.
Now, about the moss. You cannot buy moss easily, and honestly, you shouldn’t. It grows where it wants to grow. If you have a shady patch with damp soil, rake the leaves away and wait. Moss will find it. That green fuzz creeping onto the stones is exactly what makes this path look like it’s been there for years.
Building the Path Without Killing Your Back
Ok so here’s the reality: lugging stones and gravel is hard work. I spent a whole Saturday on my version of this path and my knees complained for at least two days. But you can do this in one focused afternoon if you plan ahead.
Lay a garden hose on the ground and curve it to map out your path. Step back and adjust the curve until it looks right from your house or patio. That’s your template. Remove the grass inside the hose line, about four inches deep.
Drop your stones in place first. Stand on each one to see if it rocks. If it wobbles, scoop out a little dirt or add a handful of sand underneath. Pack it down with your heel. Then, pour the gravel over the whole area and sweep it into the gaps. Done. No cement, no special tools, no complex math.
Positioning Lanterns for a Serene Garden Vibe
Look at the photo again. One lantern sits on the left, one on the right, and they’re placed at different distances along the curve. That asymmetry is a core wabi sabi principle. Balance comes from contrast, not from mirroring.
Place one lantern near the midpoint of the path, low to the ground, so it illuminates the stones directly ahead. Place the other slightly behind a shrub or large leaf, just peeking through. This creates layers of light and shadow. When you walk past, you catch one glow, then the other.
Aim for a timer so the lights come on automatically at dusk. You want to see them from inside your house, a small invitation to step outside. My favorite moment is watching them flicker on while the sky is still a deep blue. It changes the whole mood of the backyard.
The Quiet Corner Setup
Not everyone has an open backyard for a long winding path. The photo shows a fairly compact area, which is honestly the best way to do this. A short path along the side of your house or along a fence line can feel just as special.
The wooden structure in the background of the photo adds that final touch. You don’t need a full teahouse. A simple wood trellis, or even a stained fence panel in a dark brown shade, gives the eye a place to rest behind the greenery. The contrast of dark wood, gray stone, and warm lantern light is what sells the whole scene.
Even a cheap bamboo screen from a garden supply store works here. It leans against the fence, fades naturally in the sun, and costs less than fifty bucks. Pair it with some ferns and hostas in the foreground and suddenly your plain side yard feels like a retreat.
Planting for Texture, Not Perfection
The foliage in this photo is lush and varied. It’s not a single type of plant marching in a row. To get that look, buy whatever is on sale at your local nursery in the shade section. Ferns, hostas, and coral bells are reliable and inexpensive.
Mix leaf shapes. Big rounded hosta leaves with fine-textured fern fronds create a pleasing contrast. Add a few clumps of ornamental grass for movement. The slight chaos of different textures is what makes the garden feel alive.
Do not plant in a straight line. Stagger everything. Let some plants spill over the gravel path, let them touch the stones. The fact that greenery is overtaking the hardscape is the entire point of wabi sabi. It’s a collaboration between man-made and wild, and the wild always gets the final say.
Bringing It All Together
Building a serene garden path doesn’t require a massive budget or professional help. It requires a willingness to embrace irregularities and let nature do some of the work. Big statement gardens are great for other people, but this quiet, unassuming path is something you can actually live with.
Start small. Map the curve this weekend, collect your stones, and light those lanterns before the season changes. Your yard should feel like a place you want to be, not just a place you look at. If you build this path, you’ll find yourself taking the long way to the back door, just to hear the gravel and see the glow. What part of this setup fits your space best? I would love to know.
Leave a Comment