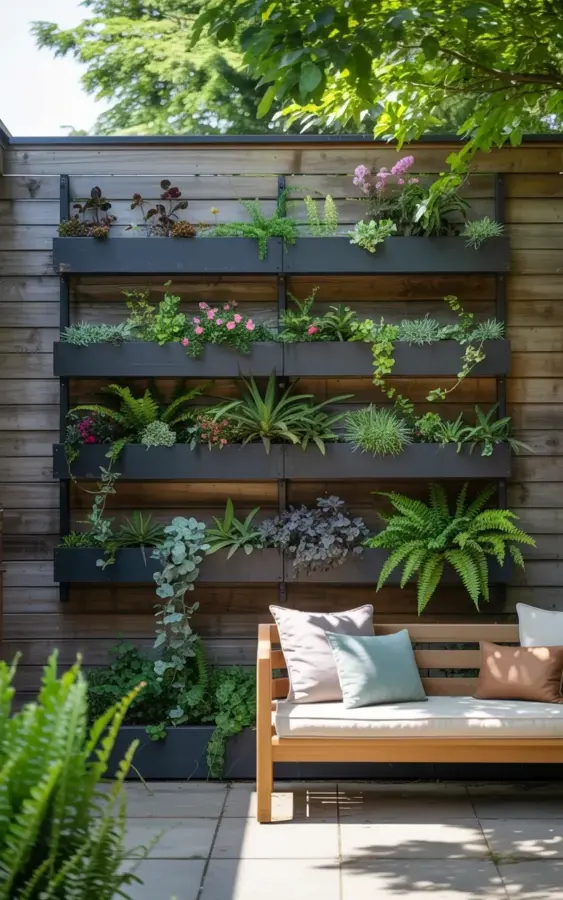
I never thought my weathered gray fence could become a garden feature until I mounted four wooden slats across it and filled them with plants. Now the tiered vertical garden wall with wooden slats and cascading flowers is my favorite spot on the small patio. The purple and pink blooms, soft ferns, and trailing succulents spill over each level, and the whole thing feels like a living tapestry. If you are short on ground space but still want that lush, layered look, this DIY approach works without breaking your back or your budget.
Why I Chose Wooden Slats for a Vertical Garden Wall
My fence was plain, gray, and a little sad. Paint would have been the easy route, but I wanted something that added texture and life. Wooden slats felt right because they are sturdy enough to hold soil and plants, and they keep the whole structure lightweight. I used pressure-treated pine, cut into four equal lengths, and stained them a warm honey color to contrast with the weathered fence behind.
Each slat became a mini planter. I drilled drainage holes every six inches along the bottom edge, then attached a shallow lip on the front to keep the soil from washing out during rain. The horizontal lines break up the vertical fence nicely, and the tiered spacing means every plant gets its share of sunlight.
How to Mount Wooden Slats on a Weathered Fence
Mounting was simpler than I expected. I marked the fence studs with a stud finder, then screwed heavy-duty L-brackets into the fence at each end of where a slat would sit. The slats rest on those brackets and are secured with a couple of screws through the bracket into the slat bottom. I left about 10 inches of vertical space between each slat so trailing plants could hang freely without touching the slat below.
- Check the wall condition: If your fence is rotted in spots, reinforce those areas first with extra wood blocks.
- Use a level: Even a slight tilt will make water pool on one side and dry out the other.
- Keep the slats shallow: Six inches deep is enough for most cascading plants, and it keeps the weight manageable.
The bottom saddle on each slat is a simple strip of wood nailed to the front edge. It holds a 4-inch depth of soil, which is perfect for shallow-rooted flowers and succulents.
Best Cascading Plants for a Tiered Planter
I wanted a mix of colors and leaf shapes so the wall felt full from day one. The top slat got small purple flowers (I used trailing petunias) and a few strands of string of pearls. The second slat holds pink petunias with some creeping Jenny for bright green contrast. The third slat is my favorite: ferns, echeveria rosettes, and a burgundy trailing succulent called donkey tail. The bottom slat repeats purple flowers but adds leafy green coleus for height.
Cascading plants are the real stars here. Petunias and calibrachoa bloom all summer if you deadhead them regularly. Succulents like the string of pearls and donkey tail need less water, so I planted them together on the same slat to make watering easier. The ferns add that soft, airy texture that breaks up all the round flower heads.
Planting Tips for Your Vertical Garden with Succulents and Ferns
I learned the hard way that you cannot just dump potting soil into a shallow slat and hope for the best. Mix two parts standard potting soil with one part perlite and one part fine orchid bark for drainage. Succulents hate wet feet, and ferns hate dry roots, but this mix keeps both happy if you water by feel. I water the top two slats every other day in summer, and the bottom two every three to four days because they stay shadier.
When planting, lay a piece of landscape fabric inside the slat before adding soil. It stops dirt from washing out the drainage holes and keeps the roots contained. I also tuck a slow-release fertilizer pellet into each planting hole so the flowers keep pumping out blooms without me having to remember liquid feed every week.
Maintaining Your Outdoor Wall Decor Garden
Vertical gardens need a little more attention than ground beds because they dry out faster. Mine is south-facing, so the top slat gets hammered by afternoon sun. I check soil moisture every morning by sticking my finger into each slat. If the top inch is dry, I give it a slow drink from a watering can with a narrow spout. A hose with a spray nozzle works too, but aim for the soil, not the leaves, to avoid fungus.
Deadheading takes me about ten minutes every other day. I just pinch off the faded blossoms and any yellowing leaves. The ferns get a trim once a month to keep them bushy. Overall, it is less work than a full flower bed and way more rewarding because the wall greets me every time I step outside.
Small Patio Ideas: Making the Most of Vertical Space
My patio is only six feet by eight feet. The garden wall takes up zero floor area, which leaves room for a bistro table and two chairs. I placed a wooden planter box at the base of the fence, right below the lowest slat. It holds a dwarf Japanese maple and a few pots of herbs. The box ties the whole wall together and catches any drips from the slats above. It also gives my dog a place to sniff without knocking into the hanging plants.
If you have a tiny balcony or a narrow side yard, this setup works beautifully. Use shorter slats or just two tiers instead of four. You can even mount them on a wooden privacy screen if you do not have a fence. The key is to choose plants that trail and tumble, not grow upright, because the horizontal slats naturally encourage that cascading habit.
That first morning I walked out and saw the purple petunias already spilling over the edge, I knew the project was worth every bit of effort. The tiered vertical garden wall with wooden slats and cascading flowers turned a boring fence into a living photograph. If you have a blank wall and a Saturday afternoon, try this yourself. Start with one slat and one plant, then build up. Your patio will thank you, and so will the bees.
#verticalgarden #outdoorwalldecor #diygardening #cascadingplants #woodenslatplanter
Leave a Comment