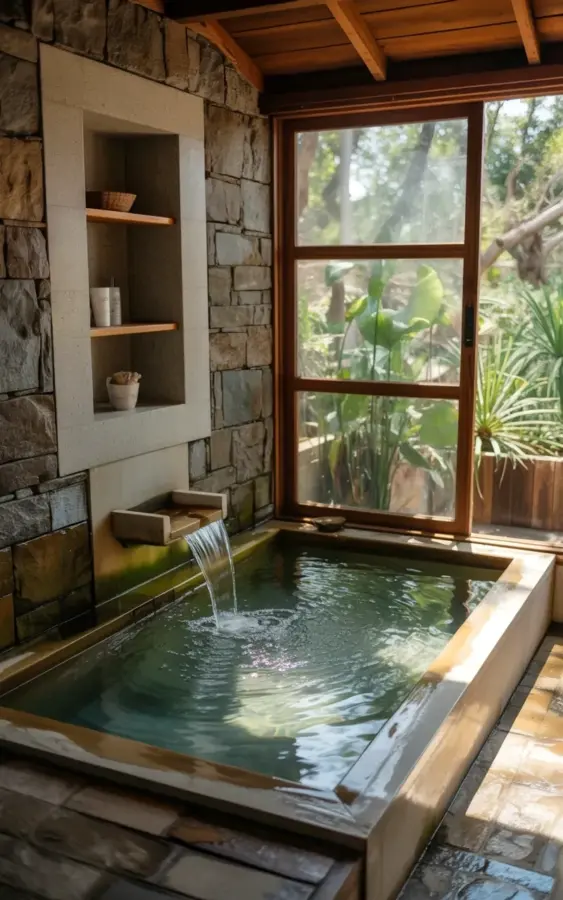
You have the perfect corner in your house for a bathroom retreat, and you can already see the waterfall and the wood. Then you make one avoidable mistake, and the whole thing becomes a mold problem or a splinter factory. I have watched a lot of indoor soaking tub projects go sideways, and it almost never has to do with the tub itself. People fall for that gorgeous photo of a wooden tub in a stone wall nook, with water streaming down like a mountain spring, and then they forget that this is still a working bathroom. That is how you end up with a warped shelf and a damp towel smell no candle can cover.
Look, I am not here to talk you out of the dream. That light-colored wooden tub, the rough stone wall with its visible layers, the little shelf niche holding a steaming cup of tea, the big window showing the green outside, that is a real goal. But the photo only shows the soaking. It does not show the plumbing, the sealant, or the day you realize the pump is too loud. So let’s walk through the common mistakes, the ones nobody puts on their Pinterest board, and how to avoid them without losing the cozy magic.
Mistake #1: The Waterfall Tub Needs a Real Water Plan
A waterfall tub looks effortless, like the mountain found its way indoors. In practice, that falling water has to go somewhere, and it has to come from somewhere. The classic DIY failure is hooking up a recirculating pump that is too small for the height of the stone wall. You get a trickle, not a cascade. Or worse, no overflow channel, so the tub overflows quietly and ruins your floor.
Here’s the thing to remember: the water in the photo is pouring from above, which means the pump has to lift that water against gravity. Calculate the head height, not just the distance from the tub. And put in an overflow drain that is actually big enough. I know someone who skipped this, and their beautiful nook turned into a water feature on the wrong side of the wall.
Mistake #2: Don’t Treat Your Wooden Tub Like a Plastic Bathtub
The smooth polished surface of a wooden tub is what makes it feel so natural. It also makes it thirsty. Wood is a living material, even after it becomes a tub. If you forget to oil it, or if you leave water sitting in it for days, the grain will dry out and crack. Honestly, I have seen wooden tubs that looked like they went through a desert summer.
Avoid this by committing to a care routine from day one. Use a penetrating oil finish that is safe for skin, and reapply it every few months. Do not scrub with harsh chemicals, do not let bath salts sit on the bare wood, and always dry the sides with a soft cloth after draining. That little extra effort is the difference between a tub that lasts decades and one that becomes a plant pot.
- Dry the tub after every use, even if it looks fine.
- Re-oil the wood every season, or more often if you use it daily.
- Never leave metal or glass bottles sitting directly on the wood for long periods.
Mistake #3: The Stone Wall Nook Is a Moisture Magnet
That rough textured stone wall with its natural patterns is stunning, I will give you that. It is also porous as hell. Water will find every little crack and pocket, and if you did not put a waterproofing membrane behind the stone, you are in for efflorescence, mold, and crumbling mortar. A favorite mistake of the overly optimistic renovator is to assume that because the stone looks sturdy, it is waterproof.
You need to seal the stone with a natural sealer, not a generic one that leaves a shiny film. And you need a small ventilation fan, even if you do not think you need one. The waterfall sprays micro-droplets, and those droplets land on the stone, the wood, and your clean towel. Actually, let me rephrase that. They land on everything. So plan for air movement, not just drainage.
Mistake #4: The Big Window Can Be Your Best Friend or Your Worst Enemy
That large window on the right side of the frame, showing all the green foliage outside, is the soul of the space. But a big window right next to a soaking tub is a privacy and condensation nightmare. I have stood in a beautiful bathroom with a clear window, feeling like I was on display for the neighborhood. Not relaxing. Also, when you step out of a hot tub, the glass fogs up and then drips on the wood.
Solution? Use frosted or textured glass, or put the window at eye level only, not full height. The photo shows the green from the inside, which means the glass is treated or the angle is just right. You can get that same view with a privacy film that blurs the plants beautifully. And do not forget to temper the glass for safety, because a sudden crack from temperature change is not fun.
Mistake #5: That Little Shelf Niche Is Trickier Than It Looks
The wooden shelf niche carved into the stone is the genius detail of this design. It holds your tea, your candle, maybe a tiny plant. But I have seen these shelves built as flat, shallow boxes that collect water like a birdbath. And if you put a hot candle on bare wood, you will get a ring stain that never comes out.
Angle the shelf slightly so water runs off. Make it deep enough for an actual mug, not just a shot glass. And consider a stone or metal insert for the bottom, so you can place a candle without worrying about scorch marks. The photo shows a smooth wood shelf, but that is after a professional finish. For real life, add a little lifted tray or a cork mat. Small thing, big difference.
Mistake #6: Don’t Forget What’s Underneath the Tub
That rectangular wooden tub is heavy when empty. Fill it with water and a person, and you are dealing with several hundred pounds concentrated on one floor area. People skip the floor reinforcement because they think the stone wall will carry the load. The wall carries the water feature, not the tub. The floor is what holds everything.
You also need a floor drain. Not under the tub exactly, but right in front of it, so that just in case you have a small overflow or a splash accident, you can rinse the stone floor and let it flow away. And think about how the tub empties. A hidden pump or a gravity drain? If you skip the floor drain, you will be mopping up the overflow with a towel while your back hurts. I have been there. It is not relaxing.
So, after all that, picture the scene again. The waterfall rolls down the stone wall into that smooth wooden tub, you reach over to the shelf niche for your tea, and the window shows the green leaves swaying. This can be yours without the mold, the warped wood, or the privacy panic. It just takes a little honest planning. Go measure your space, test your water pressure, and give your plumber a hug in advance. Future you, the one soaking in that cozy bathroom, will be very grateful.
Leave a Comment