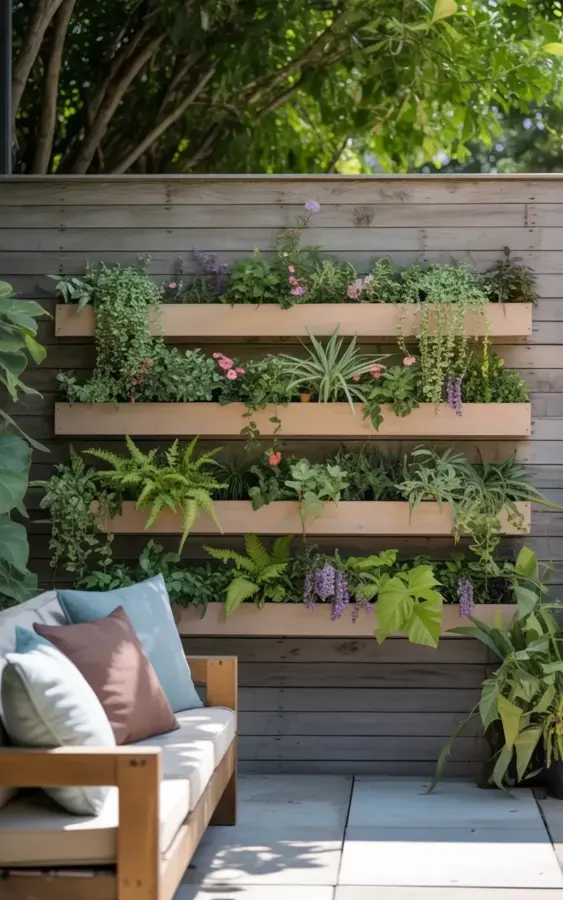
Standing in my backyard with a cordless drill in one hand and a level in the other, I realized the whole project was just four wooden slats and a handful of potted plants. That is what most people get wrong about a vertical garden wall. They picture irrigation lines, drip trays, pocket planters, a custom steel frame, maybe a small crew of professionals. No. You can mount the entire thing on an existing wall with fewer tools than it takes to assemble a cheap bookshelf.
The setup I keep coming back to looks like a postcard. There are four horizontal slats anchored to a weathered gray wooden wall. The top row runs small purple flowers and trailing vines. The second row has pink flowers mixed in with all kinds of green foliage. The third row is a jumble of ferns, succulents, and more trailing plants, and the bottom row goes heavy on purple blooms and leafy stuff. A wooden bench sits below it, which is just the right place to set your coffee while you water. It looks complicated from across the yard. Close up, it is embarrassingly simple.
What You Need for a DIY Vertical Garden on a Budget
Before you buy anything, take a hard look at the wall you plan to use. The slats do not care if the surface is wooden siding, brick, concrete, or painted stucco. They do care about getting a solid anchor behind them. I found studs on the first try because I used a cheap magnetic stud finder, but if you have masonry, plan on using tapcon screws and a hammer drill.
Here is the short list for the project:
- Four wooden slats, around 1x4s, treated or naturally rot resistant (cedar is worth the extra few dollars).
- Exterior wood screws, one per stud or anchor point per slat.
- A level, a tape measure, a drill, and a pencil.
- Potted plants with drainage holes. You heard me right, simple pots, not a custom planter system.
- Four or five small strips of wood to make a front lip, which you will want if your wall has any angle to it.
One detail nobody warns you about. Potted plants slide off a bare slat during a decent rainstorm, so screw a small vertical lip onto the front edge of every shelf. It takes ten minutes and saves you from a muddy mess of shattered terra cotta.
How to Mount Tiered Planters on an Outdoor Garden Wall
Start by marking your slat positions with a pencil before you touch the drill. I spaced mine about 14 inches apart, which leaves enough room for ferns to drape down without crushing the plants below. The bottom slat should sit at least a foot above the ground, especially if you have a dog that likes to dig at things that hang low.
Hold the slat flat against the wall and use your level to check every direction. Do not trust the floor or the top of your siding for reference; I learned this the hard way and now one slat has a subtle tilt that bugs me every single morning. Pre-drill the screw holes so the wood does not split, then drive the screws until they are snug but not chewing into the surface.
Test each row with your heaviest pot before you commit to the next slat. A wet container of trailing ivy is heavier than you think, and the last thing you want is to drill three rows and then realize the bottom one sags. The whole process of mounting four slats took me about two hours, including my broken screw extraction and a brief argument with a level that was not the problem.
Which Plants Actually Work Well in a Vertical Garden Wall? Honestly, These
Look, the photo above is the proof. The middle section with the ferns and succulents is the one to imitate. Trailing plants steal the show on a tiered wall because they soften the lines between the wooden bars. English ivy, creeping Jenny, and any variety of pothos will hang down nicely if your climate allows them outdoors.
Succulents are the low-maintenance heroes here. They tolerate the dry pockets that form near a wooden wall, and they do not complain when you forget them for a week. Ferns, on the other hand, drink water like teenagers drink soda, so give the middle row extra attention during summer heat. The top and bottom rows in the picture run those small purple flowers, and honestly, any compact bloomer like lobelia or calibrachoa will do the same thing. Just check the sunlight on your wall first. My succulents get blazed by the setting sun for four hours every evening. Not ideal, but at least they flush pink and look dramatic.
Building a Wooden Planter Box to Replace the Plain Slats
If you want a more polished look than sitting pots on a board, build a basic wooden planter box and mount that to the wall instead. The construction is standard five-board lumber, bottom piece, two sides, a back, and a front cut slightly shorter so the plants can spill over the edge. Screw the boxes directly to the wall studs and you can remove them for winter storage.
Do not bother with complex joinery or fancy dados. Square corners, exterior glue, and galvanized screws are plenty. I built mine out of scrap cedar that had sat in my garage for an entire humid summer, and it worked perfectly. Add a small drip tray underneath each box, or let the water drain down behind the plants as long as the wall is weatherproof or covered with a plastic barrier.
Using a planter box rather than a bare shelf also lets you pack more plants into each tier. That is how you get that
Leave a Comment